
UNION ARENA: Yellow BLEACH Deck List and Guide (Vol. 2)
Bleach Yellow comes back from the grave
BLEACH has always had an influence on the UNION ARENA North American metagame. While Ichigo and Toshiro focused decks have had consistent appearances in large and small events, many people passed on playing any decks from BLEACH Yellow, and I don’t blame them.
While mechanically interesting, most Yellow BLEACH decks did not have access to the same consistency tools that most other decks in the game do, even decks outside of the IP. However, the highly anticipated BLEACH Volume 2 has finally given BLEACH Yellow the support it needs….kind of. While new cards were printed to strengthen Ywhach, Jugram, and Äs Nödt, UNION ARENA mainly focused on cards for a brand new deck based on the misfit SR from Volume 1: Bambietta Basterbine.
The addition of The Bambies and Zombie affinity cards has brought BLEACH Yellow to a whole new level. Not only have I absolutely loved testing this deck on my own, but I went undefeated (4-0) at the first tournament I played in this past week using the deck.
Below, I’ll be diving into my tournament winning deck, card choices, and even specific matchups to better help you pilot this powerful deck.
Yellow BLEACH deck list
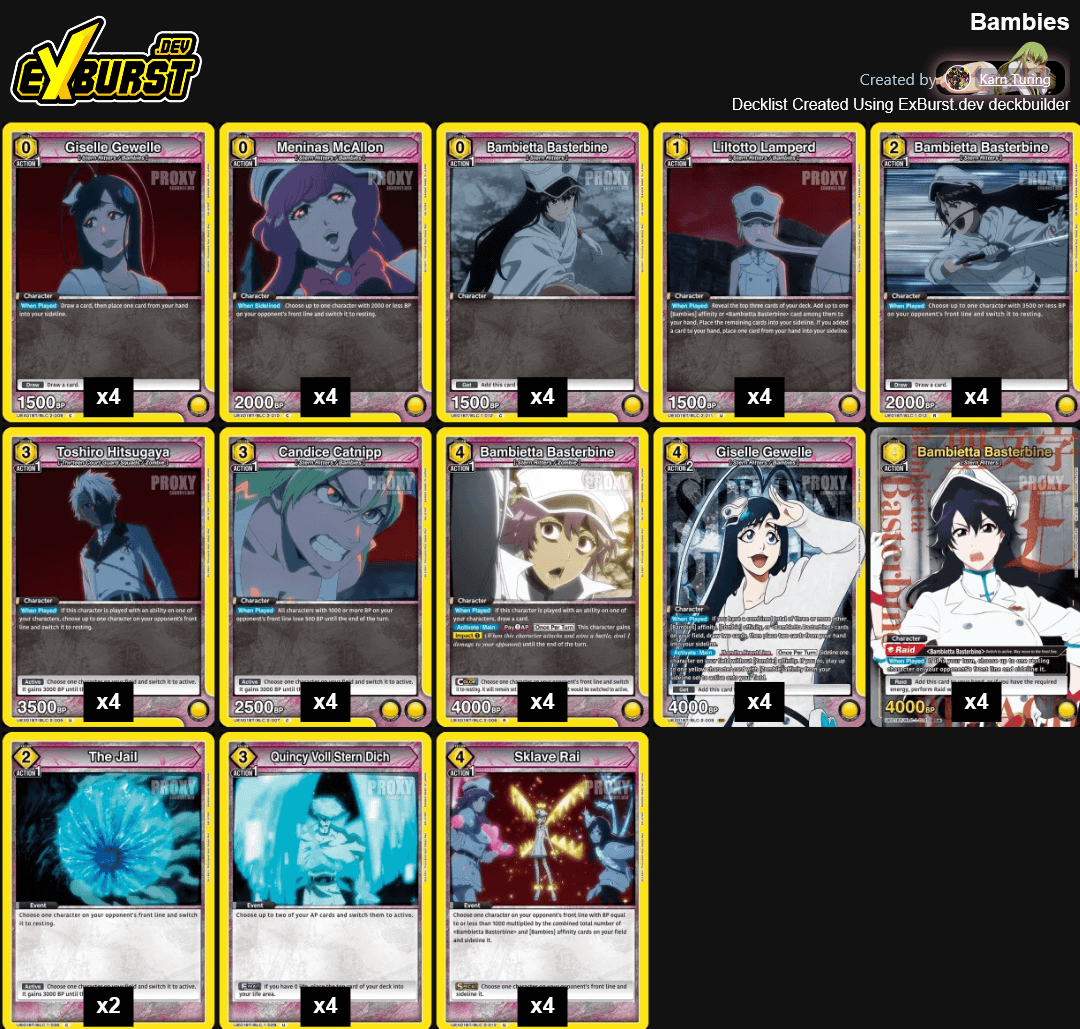
This list is pretty straight forward. You need four copies of every Bambietta, [The Bambies] affinity, and [Zombie] affinity cards. Adding in our four “Special” cards and four “Final” cards brings us to 48 cards in total. These cards work so well together that I don’t think there is too much adjusting to be done here. The last two cards are pretty flexible, but I chose The Jail thanks to its synergy with all the rest effects this deck can use.
Yellow BLEACH – key cards
Giselle Gewelle

Giselle is the best card in this deck, and it isn’t even close. Her “When Played” effect will almost always meet its requirements with this deck list, helping you find the cards you need and, ideally, place more Zombie affinity cards in your sideline at the same time. She also has 4000 BP, making her a reasonable threat to most cards when on the attack.
The “Activate: Main” ability, however, is where Giselle really shines. This ability trades any non-Zombie affinity card on your field for a [Zombie] in your sideline, played active. Energy requirements are ignored and the [Zombie] can be played to either line. While we have seen two-AP cards play characters active before, this is the first time we have seen this effect be repeatable. If Giselle goes unanswered by your opponent, she will quickly overrun your opponent with a zombie army.
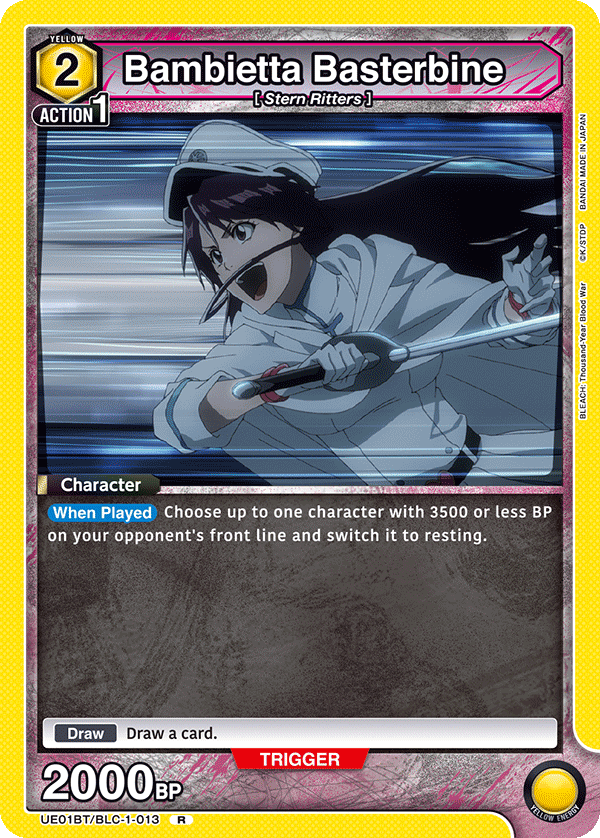
Bambietta – R [Zombie]

While Giselle is the core card for the deck, this new Bambietta card is the deck’s namesake. The “When Played” allows you to draw a card if played by your Giselle’s effect, which is the most common way Bambietta will get to the field. In addition, Bambietta can gain Impact 1 until end of turn by using one action point.
This is a good tradeoff, as most times this card doesn’t cost an AP to play anyway due to Giselle’s effect. The best feature of this card is the yellow Color Trigger. This deck gets a lot of value from resting your opponent’s cards, so getting to rest a card while setting up your main attacker to get played by Giselle on your next turn is a particularly strong pairing.
Toshiro – U [Zombie]

As the only other Zombie card in the deck, it may be easy to overlook this humble-looking 3500 BP card. The “When Played” effect provides more than enough utility though, allowing you to rest any card on the opponent’s frontline as long as he was played by card effect.
That restriction means that, once again, Giselle will be the best way to play this card to your field. Similar to our Zombie Bambie, the Active trigger gives you good value when this card is in life, and turns into a free copy in sideline as soon as the trigger resolves.
Sklave Rai – Special
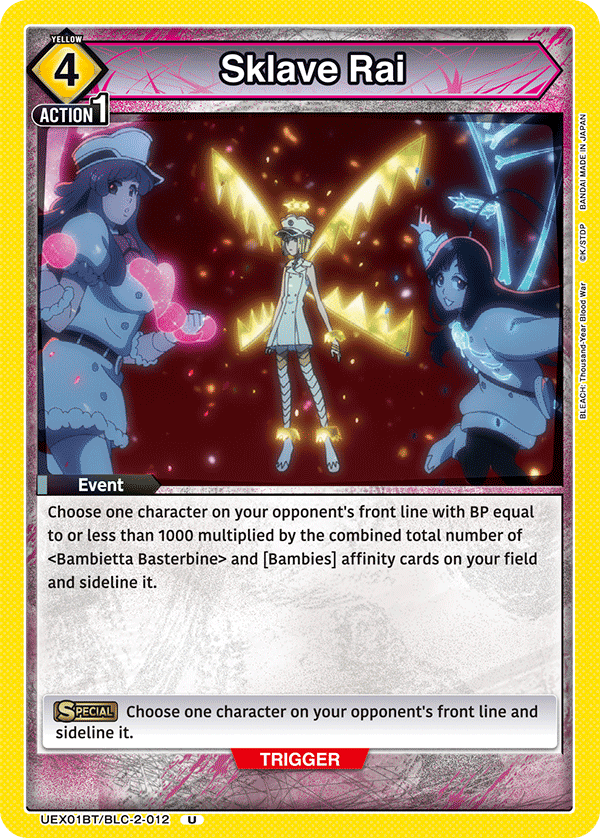
This “Special” card works a little differently from most, but isn’t too far off in practice from most other decks. Count the number of qualifying cards on your field, multiply by 1000, and sideline something on your opponent’s frontline with BP less than or equal to that value. The way this deck is built, every character except for Toshiro counts towards this ability. There will be very few times where you can pay the energy cost for this card but not sideline the card you want to.
Meninas - C
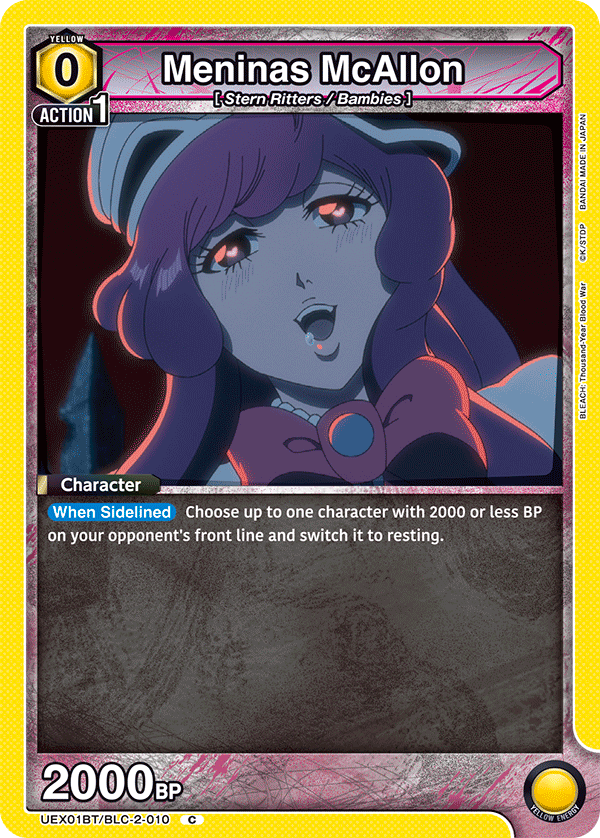
Meninas becomes a particularly valuable card when sidelined by Gieselle. The 2000 BP limit is restrictive, but when timed properly alongside your other cards, you will leave your opponent with little to no blocking options.
Bambietta - SR

While this card didn’t quite mesh with any deck builds in BLEACH volume one, the new Bambies/Zombies package gives it plenty of love. The Bambies deck will rest cards frequently, so you can press the advantage even further with this Raid card by sidelining an opponent’s rested card. Keep in mind that this effect only applies on your turn, so you will rarely want to put Bambietta in play off of the Raid trigger.
Unless you really need an additional blocker, just add the card to your hand. Don’t be afraid to play this card un-Raided either, as a 4000 BP attacker is always a strong option when on the field.
The Jail

This card is simple, yet powerful. For a low two-energy, you can rest any card on your opponent’s frontline.
Strategies and Combos:
Many of the cards in this deck have fairly straight-forward abilities that seem simple on paper, but when combined together create extremely powerful turns that put a lot of pressure on your opponent. Because of this, I wanted to go over some of the strategies and combos I found while playing this deck so that you can bring out the best in each card you play.
Let your zombies die
The Bambies deck has a leg up on most decks when it comes to defense. Sacrifice blocks are less of a cost to your gameplan than most other decks, so let your Bambietta and Toshiro die to combat frequently. As long as you have a Giselle on board or in the hand, you will get much more value out of blocking then you will from taking early hits to your life points.
In particular, look to get your Toshiro card back into your sideline as often as possible, as his “When Played” ability is much better for pressing the offensive compared to Bambietta.
If you are good at analyzing your opponent’s board state, there will even be times where you can use Toshiro to block an Impact attacker so that you can re-use Toshiro’s effect. Managing your zombie cards so that they won’t stay dead is key to winning with this deck.
Think carefully about who you sideline
Meninas’ “When Sidelined” effect makes her an obvious choice to pay the cost for Giselle’s main ability, but don’t default to her all the time! Your opponent is most likely to move their low-BP characters to their frontline when they are low on life points, allowing them to block your attacks without sacrificing their attackers. Because of this, your other zero-cost and one-cost cards, like Giselle (C) and Liltotto (U), are much better choices to pay this cost in the early game.
Those cards are mostly there for “When Played” abilities, so you can give them extra purpose while saving Meninas for the right time.
Similarly, a Bambietta Raid is just a 4000 BP attacker after her effect is resolved. If your front line is already full, using the Raid card to pay Giselle’s cost can be worth it, especially if you already wanted the Zombie Bambie on field.
After all, if both cards have the same BP, why not draw a card and maybe get some Impact while you are at it? The only cards that I think should almost never be sidelined are Candice, zero-cost Bambietta, and two-cost Bambietta. Candice is your only two-energy generating card, so she is too valuable to your energy line to give up in most cases. As for your Bambietta cards, you want to keep the threat/bluff of a Raid play as often as possible, so avoid sidelining your Raid targets whenever possible.
Manage your energy line
This deck thrives if you can end your turn with at least three energy on your energy line. If you can manage four energy, that will be even better. Our main goal is to make sure we always have enough energy and AP to play a Giselle on your next turn, even if we already have a Giselle on board. This is a big part of why Candice should rarely be used to get your zombies on board, as just Candice and any other character card bring us into our desired three energy range.
I would only recommend going below three energy if you have a strong chance at closing out the game, or if you have enough information on the game state to know your Giselle won’t be removed from the board on your opponent’s turn.
Optimize how you play Giselle
This is mostly a collection of small bits of advice that all center around this card, but using them all at the same time makes a huge difference in how the deck plays.
First, start your attack phase with Giselle whenever possible. In the case that your opponent reveals a “Special” trigger from their life area, Giselle is the card they will most likely choose. By attacking with her first, you are more likely to get all four attacks during the turn. In the late game, you may even force them to sideline an upcoming attacker instead in order to preserve their life points. And since your other attackers are most likely Zombie cards, it is a small cost to see them die to a special trigger.
Second, keep in mind how she interacts with her own ability. You can use Giselle herself to pay the cost of the “Activate:Main”. You can also play a Zombie to the front line as a fifth card, then send Giselle to removal when you have to reduce back down to four cards.
These two tips are particularly strong in the late game if you just played Giselle that turn, as she isn’t played active and will be a rested card on your frontline otherwise.
Finally, keep in mind that the Zombie card can play to either line. You can use this to help maintain your three or four energy, and works best if you already wanted to rest a card with Toshiro, or if your frontline is full.
Combo 1 - Meninas and Toshiro
When your opponent is low on life, use Giselle to sideline Meninas and play a Toshiro. This allows you to rest up to two cards, but which ones you choose are key. If your opponent is all but forced to block all of your attacks, then resting their lowest BP cards is your better option. This means that they will have to block with their 4000 BP attackers and will be less likely to make a comeback if they live through your turn.
As a note, both Toshiro and Meninas effects will activate at the same time, so you will get to choose the order that they resolve in. While I can’t think of an example where this order matters in our current meta, it isn’t unreasonable to guess that there may be a deck where cards gain or lose BP based on rested cards on your own field. In case that ever happens, just know that you do have the flexibility to adapt to such a situation.
If you already had Giselle on field when you started this combo, you’ll probably have some AP to spare. Playing The Jail or Raiding a Bambietta can be particularly brutal against your opponent in these situations. If not, building your board up to prepare for a potential counter-attack is still extremely valuable.
Combo 2 - Candice, Bambie, and more!

While it is more niche, Candice can open up plays that help you control the board in a much more oppressive way. To start with, her “When Played” drops almost all characters on your opponent’s front line by 500 BP. On the surface, this means that Toshiro can now beat your opponent’s 4000 BP cards in battle, but there is so much more to this humble effect.
Reducing a 4000BP card to 3500 means that it is now vulnerable to your Bambietta (R) from volume 1, resting an additional card on the field. If you have a Bambietta Raid in hand as well, the card will end up in the sideline instead. A 2500 BP card can now fall victim to Meninas’ effect, giving more choices to which blockers you can rest.
Also, Candice’s ability may also bring a card just low enough to fall victim to Sklave Rai if it was 1500 BP too strong before she was played. The best part about this effect is that it applies to all of the cards on your opponent’s frontline. This opens the possibility that multiple of these cases could happen at the same time. While yes, it isn’t going to happen often, keeping every possible edge in mind will allow you to find wins where other players may not.
Final Thoughts:
While Bambies was the deck I was looking forward to building the most in Bleach Volume 2, I did not expect to love the playstyle this much. This deck seems to have so many meaningful choices to be made each turn, many of the cards interact with each other in so many small ways that puzzling out your sequence for a turn is a fun challenge. I am excited to see how this deck evolves as more events come up, especially in the upcoming Rare Battles for Bleach Volume 2, where this deck is sure to be a threat.